Showing posts with label painting furniture. Show all posts

Monday, 2 September 2013

Updated faux bamboo barrel chair

The weather cooperated with me today, despite some rain earlier today. I completed one of the three chairs that I picked up this weekend.

faux bamboo barrel chair

I hand painted the primer on because I’m still too chicken to put an oil based paint in my hvlp sprayer. I did however use the sprayer for the white final finish. Talk about making life easier.

I bought the fabric from Tonic Living a while ago, but didn’t use it as planned.  I went to Canadian Tire and bought a foam camping mat that measure 2” x 24” x 72”, plenty for several chair seats and a bargain at $21. I used the existing seat bottom which was only nailed in. At one point these chairs had cane seats.

There was still a small gap between the covered seat base and the rim of the chair, so I made some trim out of the same fabric. Once I had the seat covered with foam, batting and fabric, I simply stapled the trim onto that.

faux bamboo barrel chair

It covered the gap perfectly and is a nice and snug fit.

faux bamboo barrel chair

faux bamboo barrel chair

I am learning not to be afraid of my spray gun and for the next two chairs I will use it, for sure! What a time saver and the finish is amazing.

faux bamboo barrel chair


I love Labour Day! I hope you are enjoying yours.

Sharing at:
My Uncommon Slice of Suburbia
Love Grows Wild

Wednesday, 11 July 2012

As seen on … Apartment Therapy

Oh my, I’m so chuffed.  Today my bamboo étagères were featured at Apartment Therapy, in the before and after section!
I wouldn’t have known had someone not emailed me to ask a question, as I don’t regularly read AP, but I will now  Ha Ha.
painted bamboo etageres at JunkinJunky.blogspot.com
My original post is here and you can read the post at Apartment Therapy here.
Totally made my day!

Saturday, 21 May 2011

Tiffany blue, black and white bedroom

When my daughter became 13 last month, I asked her if she would like me to redecorate her bedroom. Sure she said, with a tiny wee bit of enthusiasm; she doesn’t excite easily :)

I will forewarn you that this is a long post with lots of pictures.

DSCN1456-1


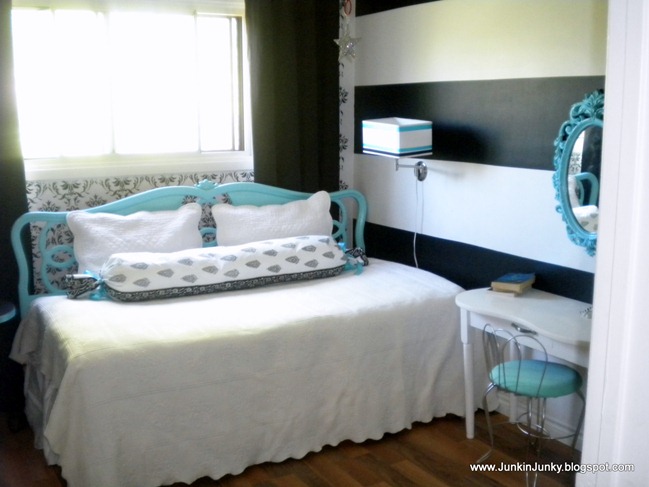
I searched for a day bed for a while, then remembered that she had a daybed before and it kind of reminded me of a crib, so nix that idea.  While searching Craigslist I found this king size headboard; hey, that will work. I dashed off to another city to pick it up for $50. I absolutely love the shape. The colour, not so much but I had plans.

download 
I had to do some McGyvering to get it to attach to the bed frame so that it didn’t rest on the wall and smoosh (that’s a word, right?) the curtains. The headboard is about 3 inches wider than the length of her single bed, so I attached some 2 x 4’s to the frame legs and drilled into the 2 x 4’s to attach it to the bed frame. Just in case you decide to do this, be forewarned.

DSCN1440-1

Then I priced out damask wall paper and at $40 a roll, that was out of the question. I created a stencil and went to work. It took some time and some patience :)

DSCN1390

Next up were the stripes. I measured to have 3 of each colour, coming out at 16” each.

I picked up a small vanity from Kijiji. It will do for now and serves as a night stand.  I’m thinking down the line I would like to get a long and narrow parsons table. MY BF had the little chair already and I sprayed it with silver and covered the seat with a tshirt that I got at the GW.

DSCN1429-1

Rather than have a bazillion pillows/cushions on her bed, that I knew would only end up on the floor, I opted for one large bolster. I bought this table runner at Home Sense. I stuffed it and tied the ends in ribbon.

DSCN1422

Let me show you a little piece of her room before

009

Let me take you on a tour of her newly decorated room

DSCN1426-1

Headboard painted in Tiffany blue. Bolster created out of a table runner.
DSCN1438-1

Matelasse bedspread and pillow shams from the thrift store, picked up over time.
DSCN1428-1
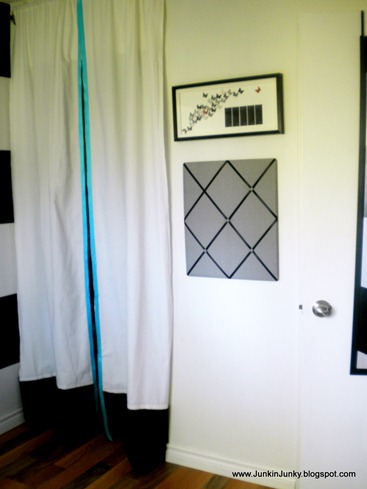
I removed the ugly sliding closet doors and hung up the drapes that I made, using swing arms. Ribbon from the dollar store was added to the edges using iron on tape. The memo board was a couple of dollars from the thrift store and the butterfly art was made for her a while ago.

DSCN1427-1

The mirror has lived in every room of my house in grey, but now it looks pretty in blue. I moved the swing arm lamp from the back wall and added ribbon to the shade.

This little Ikea table also received a quick update by adding ribbon.


DSCN1432-1DSCN1432-1 
 DSCN1433-1

Here is a close up of the damask pattern I stencilled on.

DSCN1437-1
I can’t wait for her to see how the room has come together. The last things to do are paint her book case and return it to her room , paint her chandelier or get a new fixture, and make a floor cloth.


Please weigh in on your thoughts for the floor cloth. I was thinking of doing this zebra pattern.

DSCN1424-1

Black and white may be a little too busy for this space so what do you think of doing it in the Tiffany blue?  Or should I do something totally different?
Cost breakdown:
funky 70’s headboard - $50
Vanity - $25
quart of black paint - $17
Ribbon - $5
Spray paint - $12
tshirt to cover chair - $2.50
Total: $110.50
Everything else I already had.

I just loved doing this room. Growing up, my shared bedroom was quite utilitarian, so it’s nice to make one that is pretty.

Update: Here is the completed floor cloth.  I don’t know why I doubted myself, it turned out wonderfully.  You can read about the process here

DSCN1456-1

Sharing this project at: Join  us Saturdays at tatertotsandjello.com for the weekend wrap  up           party!
Funky Junk's Saturday Nite SpecialChic on a Shoestring DecoratingThe DIY Show Off >

A big thank you goes out to Kate at The Besties for featuring this project. Thanks Kate!


Thursday, 17 February 2011

Metallic table

002
I picked this table up for $10 early in December and it just sat, and sat, and sat.
I primed it with an oil based primer and then did a bazillion coats of metallic paint (a slight exaggeration, but it felt like that)
DSCN0480 DSCN0483
Then rubbed on and off some black paint mixed with glaze.
003017
And now it has a home
020
It only had one of the original knobs, so I am on the hunt for some nice sparkly knobs.
Painting furniture is not my favourite thing to do, but it’s too cold here to spray paint. If it weren’t so cold, you can betcha that that is the route I would have taken.
Sharing this at
150 2 Fab Friday #35

Chic on a Shoestring Decorating

Friday, 24 September 2010

I just love when everything comes together

Sometimes I have a vision. Despite the best made plans, my vision doesn’t often come together, but this time, it did!
Earlier I posted about a table that I had found that I loved, but it didn’t have any chairs. So, I found another table with 6 chairs, but I wasn’t in love with the table.
Cue Hallelujah!
I painted the table a dark gray from the Behr Premium Plus line named Pencil Point (and it was free at the recycle centre).  The chairs were spray painted with a flat white then lightly distressed.
DSCN3178
My old coffee table turned bench was a little too large to fit under the table so I cut the top down and it now fits perfectly.
DSCN3171
The bench is the first thing you see as you come up the stairs to the dining room, so I wanted something that wasn’t going to block the view. Success!
The cushions are made from placemats that I did a while ago. The seat and bench cover are a curtain that I picked up at the GW for $3.00, originally from Ikea. I was happy to be able to incorporate some of the green that I have throughout the rest of my living space.
DSCN3180
Just as Sunny predicted, I found a fabulous drum shade at the GW Boutique for $6.99, but I wasn’t so in love with the fabric. I took a piece of black fabric and sewed together a slip cover. Now my little gifted chandy looks so elegant and grown up.
DSCN3174
And now for your viewing pleasure, I present my dining room :)
DSCN3189
DSCN3191
I decided to set my table and realized that I have no clue how to set one up. It’s not something that I’ve paid much attention to so I had to go searching online for some clues :)  Whateva, it will do.

007

005 Of course you know, that in about 3.9 days, it will change again, in some way.
Yah, so I’m linking up to the following parties ;)
frugal fabulous design featureyourselffridaybuttoncopy Decor Mama
Remodelaholic Party Small button 200 x 200  (1) COAS-Party-Pick-up-Button2

partyDIY Blog button